Sunday, July 31, 2016

Grading for Learning

I am really glad to get to go to another workshop with our Assessment coordinator, Kevin.  He is so amazing as a facilitator and has great ideas about grading.  I heard him speak a few summers ago, before I started blogging, and so I am glad to be able to record some of his awesome ideas this time around.  I am actually trying to remember some information from the last session on grading I attended with him to try to include it here.  I want to be very clear in stating here that I am simply a vessel for delivering this revolutionary thinking.  I don't want to take credit for any of these ideas.  For the most part, this is true for the majority of what is in my blog posts.  However, I feel like it is particularly important here that I give the credit where it is due--pretty much everything in this post, aside from some interpretation and elaboration on my part, should be attributed to Kevin!


In Theory...
To give you the gist of his philosophy, our current grading system is antiquated.  It has been grandfathered in and we all do it because, well, we don't know of any other way!  And a lot of other stakeholders rely on it (colleges, in particular).  Changing what we do requires a lot of education--of our students, their parents, administrators, and (if we were going to make a true systemic change) the general public.

We live in a world obsessed with grades.  Too much emphasis is put on grades at the expense of actual learning.  We (students, teachers, parents, administration, the government, colleges, etc) care way too much about the product and not enough about the process.  Students get one shot and everything counts.  They can't learn from their mistakes because they are expected to get it right the first time.  This results in what Kevin calls "neural downshifting."  Students don't feel safe to fail. so they retreat to the safest, easiest option.  This often means cheating, but even at the most innocuous level it means just doing the bare minimum required to get a certain grade.

Kevin brought up the book Drive by Daniel Pink, which talks about motivation.  In Drive, they look at how likely a person is to complete a difficult task based on how much they may or may not be paid for the task.  For more complex tasks, motivation to complete the task actually decreases when a monetary value is placed on completing the task.  Perhaps this is because once you assign a monetary value, the person makes a judgement about whether the time involved in completing the task is worth the reward they will receive.  Without money in the picture, the task completion becomes about satisfaction with solving the problem as opposed to reward for solving the problem. Not only that, but an external reward tends to stop working the moment it is taken away.  Grades often work the same way.  Kevin conducted an informal interview with a variety of students and they all were on the same page about this idea:  they are much more engaged and happier with a task when they are doing it with a purpose other than to get a certain number of points.

Another huge problem with our current grading system is that it is completely subjective.  We are sold the illusion of objectivity in grades, but when you get right down to it, it is not all that objective.  So many factors come in to play--weighting of materials in class, what is graded by the teacher and how, how much emphasis is put on certain grades, what counts and what doesn't--there are just way too many variables to create a level playing field.  We can come closer to being more consistent from class to class, but we will likely never have a completely level playing field.

Think about this:  suppose you were on a college admission panel and you were looking at grades.  You saw that a certain number of students all got an A in a particular biology class.  They all came from different states and different schools (or maybe even different teachers within the same school).  Does that A really mean the same thing for each of those students?  Should it?  Do we tend to believe it does?  All of these questions are not necessarily easy to answer (you would probably have to ask many more follow up questions to really get at an answer) and that just goes to show how varied our grading systems really are.

Along these same lines, the true score theory also comes into play.  For any particular grade given, it is a combination of factors which include both true ability and random error.   Assessments are a measurement, and for every measurement there is going to be some level of error.  Sometimes an observed score is very close to the true score but sometimes it is not.  So every grade reported (based on a particular teachers' grading scheme) will include a certain amount of error (ie plus or minus 4%).  This adds another layer to the loss of meaning in a grade.  Not only is it subjective, but within a framework of subjectivity there is that extra layer of error.  Combined, these result in a significantly imprecise and inaccurate grade.

Our grading system also works as a deficit model, essentially everyone starts at 100% and we take points away.  Our grading scale therefore sets students up for a cycle of failure after one mistake.  A student can have an issue early on in a semester that sets them significantly back for the rest of the semester.  They could be in a hole that they cannot possibly dig themselves out of.  Notice the average score of each student below.  I have created a graph of the grades for the first 3 students over time, which you can find below the table.


Source:  http://hirschda.blogspot.com/2013/11/heres-whats-wrong-with-averaged-grades.html


You can see that even though each of these students end up with the same 79%, their actual grade progression shows very different stories.  A grade doesn't have to be an average.  This is the thing that causes the most issues for students who have either one bad grade or a series of bad scores and then they are in a hole that they can't get out of.  A grade should be a measure of central tendency to mitigate those outliers.  When averaging, outliers have a huge impact (could be positive or negative) and will not really show a student's true understanding necessarily.  This comes back to the idea that learning is not fixed, that growth can occur and it should be reflected in a student's grades.  

Zeros are particularly damaging in grade calculation.  Notice students 6 and 7, who achieved near perfect scores throughout the semester, but each also got one score of zero.  This brought their average down tremendously.  Also, think about the student who starts out with a zero or two.  Right off the bat, they are in a hole that is hard to get out of.  Their chances of achieving an A in that class are dramatically reduced.  Even if they work very hard and do very well for the rest of the semester, their score is tainted by that zero.  Part of the problem is that scores of zero just don't make sense on a hundred point scale.  I could not do as good a job of explaining this idea as Rick Wormeli can, so I have provided the video below for you to get a feel for the reasoning behind this concept (I think I saw this for the first time in Kevin's workshop a couple of years ago).


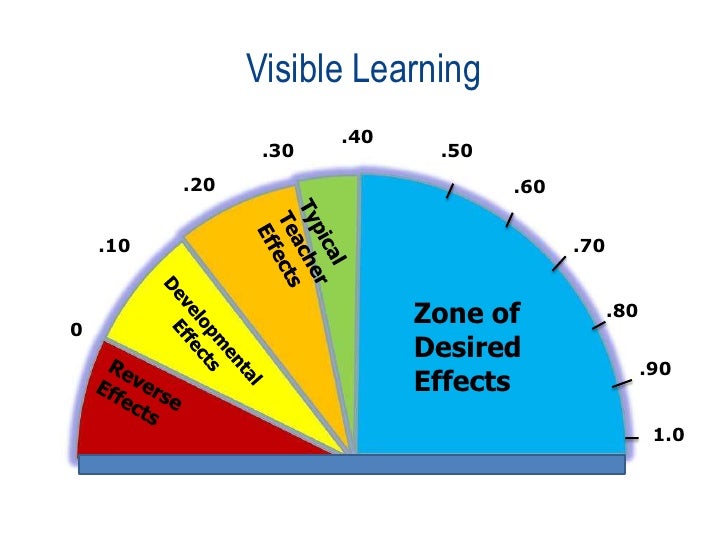
Kevin referenced the book by John Hattie, Visible Learning.  It is basically a meta-analysis of  multiple meta-analyses and is apparently very dense.  But I have often heard of it referred to when learning about various practices and their "Effect Size" on learning.  Basically, the idea of Effect Size is that there are certain effects that are inherent to a students development and just being in the room with a moderately effective teacher.  You can get an effect size of about 0.4 just from putting a student in school.  (see below, "Typical Teach Effects")  There are a few things that have a reverse effect, like retention, a student moving schools a lot, and excessive TV watching.  But here are the things that Hattie found to have the greatest effect sizes:


1.  Students know what they are expected to learn.
2.  Students know what successful learning looks like.
3.  Students receive timely, specific feedback for where they stand.
4.  Students can define where they stand relative to what "success" looks like.
5.  Students have opportunities to recover from challenges and failure. (students don't learn from failure, instead they learn from recovery from failure)

All of these things that have the greatest effect size can be accomplished through reflecting on grading practices, making the grading system more transparent, providing feedback, and putting in place opportunities for students to improve on past issues.  We could accomplish these with traditional grading practices, but it could be easier and more natural with a change in grading practices.


Another limitation we have with our current grading system is that sometimes we have smart kids that don't do the school thing well and on the other side of the coin, we have kids that struggle with concepts but know how to do the school thing well.  This can be illustrated by the table below.  Student number 1 is a student who is good at school but also learns the concepts well.  Student 4 is struggling with concepts and doesn't do school, so they are going to have a lot of trouble.  Student 1 can probably be successful with any system you put in place.  Student 4 may be unsuccessful with any system you put into place.  Now, student 2 is having a hard time with concepts but does everything they are supposed to do, so their grade is probably higher than it really should be.  Student 3 is a really good understanding of the concepts but won't play the school game, so their grade is probably lower than it should be.  It is students 2 and 3 which we can affect the most with changing grading and teaching procedures.   If we have systems in place to ensure that student 2 spends more time with what they don't know, then over time their learning will hopefully improve.   If we can truly assess what student 3 knows, then it won't matter if they don't do their homework or whatever the problem is.  There is something to be said about teaching a kid how to play the game of school, if for no other reason than that they need to develop skills to help them be successful outside of school.  The idea of changing the grading system is about addressing the issues we have in assessing this student.  Behavior-related skills should still be taught and that student should still be held accountable, they just shouldn't be punished via grading.  Grading should truly show what a student knows, and consequences for behavior shouldn't enter into it at all.


So, obviously we have a problem (ok, that's an understatement).  But now, what can we do about it?  The idea of standards based grading has been tossed around and it does take care of a lot of the problems.  It basically involves scoring students on their proficiency level on a learning standard.  Proficiency is framed as a function of time and practice, so the proficiency level changes over time, over multiple assessments.  Standards-based grading also takes into consideration, and inherently moderates, the effect of outliers.  A grade is based on overall performance over time, without focusing on just one assessment of a particular standard.  It lends itself to allowing test re-takes, not allowing a student to take a test until they are ready, providing learning experiences that do not factor into the grade (no points for homework), and any other learning-centered benefits.

But, this workshop was not about how you should convert to standards-based grading.  Kevin basically focused on all of the factors of grading that are important (yes, a lot of them are addressed with a standards-based model) and how to modify your grading and entering in the gradebook to accommodate for changes that encourage learning over grade mongering.  Kevin suggests that instead of thinking about changing your grading model to standards-based, think about how you can grade for learning.  If it so happens to include aspects of a standards-based model, so be it.


In Practice...
When re-thinking how to approach grading, we need to first think about the purpose of grades and what grades really mean.  When it comes down to it, a grade is a form of communication.  It meant to communicate the status of a student's performance for the people who are not in the room with you and the student.  Grades also have a way of communicating to our students what we think is important.  So, we have to really think about what we want our grades to communicate to all of these people.

According to Grant Wiggins, education guru, a grade needs to be both credible and defensible.  We need to define what a particular grade really means, and it is best for us to be on the same page with everyone else who is teaching that same class.  The expectations of a particular grade need to be consistent (though our gradebooks don't necessarily need to be identical).  Kevin suggested doing an exercise with  your team or PLC where you each list your expectations for a particular grade, or what that grade means in your room class.  When we did this, he had us pare down our explanation to 5 words per grade.  We shared these with each other and it was pretty interesting how varied the results were!

If you have identified what you consider each letter grade to mean, you can be empowered when you face stakeholders who question your grades.  You can explain "here's what it means to understand this" and "here is what they are doing."  You can show "this is what an A means..." and here is the evidence I have to support this (non-A) grade..."  We should keep in mind that the grade isn't the goal, but the learning is the goal.  It is important to emphasize the process when talking to stakeholders, especially parents, and even the students themselves.  Grading is essentially feedback for all stakeholders to allow them insight on whether a student is performing at the expectations.  You want to try to change the conversation from "what do I need to do to get this grade?" to "what do I need to learn?"  This is very difficult to do, admittedly, and requires a huge change in thinking for everyone.  But structure of a grading system can go a long way to make this happen.  I have heard that for teachers who grade in a standards based way, this kind of thing begins to happen naturally.

Kevin encouraged us not to worry about the "rules" of traditional grading.  He said the rules are made up, they don't really exist, so we aren't really breaking them!  Here are some things he brought up as constraints we put on ourselves and students because of the made up rules we follow:

  • You don't actually have to give everyone a test at the same time--if a student isn't ready to take the test, you can wait until they are actually ready to give it to them!  If a student takes a test before they are ready and they fail it,  you don't really get any new information because you kind of already have all of the information that test is going to give you--that the student doesn't know the material.  You could give a window of time for students to take a test in, for instance.  Or you could just postpone tests on a student by student bases.  Kevin mentioned that for concepts that are more important for future success in the class, you could have a more steadfast deadline for completion of a test.
  • And you don't actually have to give everyone the same assessment.  You have the freedom to tailor an assessment to a student so that it shows you that they learned the target in whatever form they can show that best.
  • You don't have to give "points" for everything you assign.  If the thing is assessing what students know, and you've given them enough time to practice and improve, your grade can really just come from assessments.  Ask yourself--"will including this or excluding it affect what I am communicating about the students' learning?"  Remember, grades are communication.
  • You don't have to show a student their grade on an assessment right away.  Kevin suggested not giving students the number but only your feedback.  You can require a student to do something to improve their learning before you show them their grade.
  • You can wait for quality before you grade.  Kevin suggested having a separate rubric for an assignment that shows certain expectations that have to be met before you even begin to grade an assignment with the full rubric.
  • You can give an assessment more than once.  Give them another shot.  Part of the mission and vision for our district says that students should understand that learning is not fixed, that it can always be improved.  So if a student starts off the year on the wrong foot, they aren't drowning for the rest of the semester.  After a fail, work with them to see that they actually learn the material and then assess them again.  You could have a system in place to allow for retakes OR if a student asks for a re-take, ask them "how are you going to show me you know this before the retake?"
  • ...But you can make it really difficult for them to put off your thing.  You need to find a balance between making it so much work to do a re-take that they are encouraged to do more preparation up front but not so much work that it discourages them from trying again.  You should create some discomfort, which is a practical consequence of slacking off originally.
  • ...But you shouldn't be using a grade as a consequence.  Negative behaviors such as skipping class, not studying, etc should not be met with punishment in your grading system.  The consequence should be inherent in the work they are doing for your class.  It should be more work to get caught up but don't penalize a student by taking points away from a grade if a student can really show mastery of a topic.
  • You can grade in reverse!  You don't actually have to start everyone from 100 and deduct points.  Think about that first assignment you put it.  Maybe it is pretty easy so almost everyone gets 100%.  Everyone starts at 100% and it literally just goes down from there.  Sure, you may have one or two students that could maintain 100% (with extra credit) but no one is that perfect.  Everyone starts with an A and it is all about holding on to that grade.  But what if you started from 0, so every assignment you entered brought a grade higher and higher?  At any point, anyone can get an A.  This becomes a little tricky when it is time to report progress grades.  I thought about reporting a grade as what a student is on track to receive.  A student may only be at 40% say, but if they continue to master at the same level, they are on track for an A.  This would definitely be tricky, but could be doable.  I had a colleague who was an art teacher and did something similar to this with art projects. 

All of this raises the same old issue...  by changing the way you are grading so drastically, there will be a big impact in a lot of other places.  For one, many people will not understand your grading because it is different from what they expect and what they are used to.  It will require you to educate stakeholders on your methods and rationale.  Also, Kevin brought up that many colleges are starting to notice that students are expecting re-takes and that has posed a problem.  The best thing you can do in this case is educate students on what they can potentially expect when they leave your room.  Hopefully the methods you use in grading will actually help better prepare them for the next step because the learning process will come more naturally for them, but they could be thrown for a loop when they get to college and can't retake a test, for instance.  Communication is the key to handle all of these possible problems.

A few notes on re-takes: I have been offering re-takes in some cases and I often offer some type of test correction.  But, I haven't found a way that I really like yet.  Here are some ideas that were bounced around on the topic of re-takes that I want to share...  It was suggested that to encourage preparation for a re-take (beyond requiring a certain amount of practice) you could give back a higher percentage of points the more a student improved on their original score.  Also another teacher mentioned that she allows fewer re-takes in the second semester for students she has the entire year (because there is an adjustment period for students while they are getting to know you and your assessments).  For her Honors students, she doesn't allow retakes except for one during first semester. Regardless of how you handle retakes, Kevin suggested that we report this information in the notes on the grade reporting software if we are actually changing the score.  Or alternatively, you could make a separate assignment for the retake and excuse students who did not do the retake.

This is a good leeway into my next section here...

Practical Applications
So maybe we are prepared to overhaul our grading system and we have educated stakeholders and everything is good until we go to enter grades in whatever grade reporting system we have and... now we have a dilemma.  Grade reporting software is set up for traditional grading.  It can actually be kind of tricky to manipulate it to do what we want it to do.  In my district, we use Infinite Campus.  We have been told that if everyone who teachers a particular class across the district can decide on a new grading scheme, it can be updated in Infinite Campus.  But how likely is that to happen?  We are better off figuring out a way to work around the system.  As Kevin says, Infinite Campus is a one function calculator--all it can do is average.  Here are some Infinite Campus hacks that will probably work for your grade reporting system too.

In your grade reporting system, you want to emphasize evidence over calculation.  We have an option to enter an assignment and exclude it from grade calculation.  That way, you can provide information about performance while keeping grade calculation separate.  You can include an assignment that is called "present level" that you continuously update through the semester and it can be the only thing in the grade calculation.  When determining the present level for a student, Kevin suggested a couple of possibilities.  You could take the mode of the last 5 assignments or look overall for a trend or count the most recent evidence more heavily.  We are able to set up our gradebook so that a mark can be translated into a percentage (so if you are grading on a 4 point scale, you can determine what percentage each of those points corresponds to).  Here are a couple of versions that I saw being used in the examples that Kevin showed us:

Advanced
100
Proficient
85
Developing
70
Beginning
50
Insufficient Evidence

0

4
100
3.5
93
3.0
85
2.5
78
2
70
1.5
63
1
55
0
0

Note that both of these scales have a zero and this would be for students who did not turn in work.  This could be marked as missing in the gradebook to communicate that the work was not received.  But be careful about how you interpret the zero when you are determining a present level (remember the silliness of a zero on a hundred point scale).  A colleague also mentioned that you have to be careful to enter the mark exactly as you have it entered in your scale set up or our Infinite Campus will not recognize it as a mark that needs to be converted.  One more note about keeping certain assignments out of the grading--you can enter citizenship criteria this way as well and use it to assess a students citizenship grade.

One idea that my colleague and I were really excited about was that you could group your weighted categories by the thing they are supposed to learn (unit or standard) instead of type of artifact (tests, labs, assignments).  This way, you can assess proficiency in that unit or standard.  This seems like a nice easy step into changing your grading practices.  You can still weight your artifacts by changing the point values, but you can see an overall score for the student on the particular unit.  In science, it makes more sense to group in units because a lot of what we do does not build on previous work, units are often discrete.  And using this system, you have the flexibility to make certain units worth more if they are heartier or are more important.  My colleague and I discussed making the later units worth more (especially ones that rely on prior learning) to encourage a strong work ethic through the whole semester.  Kevin also suggested that to keep it simple, within each unit you could make the assignments a group for each type of evidence and then lump all of those grades together.  This would make it even easier to maintain consistent weighting for each artifact category.  Using a system like this can make it a little tricky if you have a common final exam that is supposed to be worth the same for every teacher.  My colleague suggested leaving that as a traditionally graded assignment and entering it at the specified percentage.

We had the privilege of seeing how some other teachers set up their gradebooks.  Once science teacher had three categories; Physical Science, Experimental Design, and Communicating in Science.  These were the three main things she was assessing.  Physical Science was the content and included the summative assessments.  Experimental design was about process and she was assessing skill.  Communicating in science included things like writing, oral speaking, and visual appeal of presentations and assignments.  Once you decide to break out of the mold of grouping by type of artifact, there are really so many possibilities!

Another idea that Kevin brought up was about knowing what to assess.  He talked about curriculum standards vs. reporting standards.  There are lots of curriculum standards and they are written for teachers, they are very specific, and they are exhaustive.  Reporting standards are parent/student friendly, broader summative type standards and they are limited so there are much fewer of them.  You need to decide on the subset of standards to report on.  This totally comes back to the struggles of my PLC.  We have definitely been working with curriculum standards and therefore our work has been very overwhelming!  This summer we have been working to change this and we are making progress.  Here is a diagram he drew which I think is really helpful when thinking about standards.

So basically, you have a whole lot of stuff that you teach.  But, not everything you teach needs to be assessed.  You are going to give feedback on a subset of all of the stuff you teach.  Of the stuff you give feedback on, there is a part that you will assess.  Of the stuff you assess, only some of it will contribute to the grade in the class.  This is such a weird way of thinking about it because we feel like we have to give a grade for everything we assign.  It definitely makes a lot of sense, though.

Extra tidbits...
Here are a couple of strategies that Kevin used during the workshop:
-We read various quotes about grading, and we wrote on a post it what is intriguing, challenging, or encouraging about the quote.
-We were given various statements about learning and for each statement, we evaluated whether current grading practices support, work against, or have no impact on that aspect of learning.

Another Resource
O'Connor How to Grade for Learning

Wednesday, June 1, 2016

Literacy in the Content Area

In this workshop, I learned a lot of strategies to increase literacy, both reading comprehension and writing.  To start out, we did a priming the pump activity where we were asked to share our most powerful recent reading experience and our most powerful writing experience, then to make connections between what made these experiences powerful, and content literacy in the classroom.  This exercise was very important.  It really helped to think about what makes reading and writing meaningful.  We came to a consensus that all of these meaningful experiences had a purpose and often were within our interests. But the thing that really hit home with me is that every one of them had a social aspect to them.  One colleague talked about discussing a book with her daughter that they were reading together, another talked about being asked to write a letter thanking someone who made an impact on their life (that wouldn't necessarily be delivered to that person). I actually talked about writing this blog!  The aspect of there being some connection with another person seemed to be a common thread in everyone's most meaningful experiences.  This idea helps me to think about ways of making reading and writing more meaningful for my students.

The workshop was divided into 4 chunks; one about reading/following instructions, one about vocabulary, one on analyzing text from different perspectives, and one about interpreting non-linguistic items (charts, graphs, etc).  Throughout the workshop, cooperative learning structures were modeled and I learned a few fun celebrations for students that I will be sharing for use in the cooperative learning model.

Process/Directions
The example used is a CLOZE procedure.  A CLOZE passage would have blanks for students to fill in from the context of the text.  In CLOZE reading, the teacher underlines important parts and reads aloud to the students.  The underlined parts are read together as a class.  You would do some type of processing activity with students after each paragraph (or other chunk).  Some of the processing we did was stop and jot (have them stop and write something, maybe their definition for a word or a most important point), represent to learn (draw a picture), or note-making (in this case, writing step by step instructions).  The example was a procedure for a chromatography lab.  The reading was in paragraph form; the first part was background info and the second part described the procedure.   I am thinking to change a few labs into this format.  It seems like it will be more effective than handing students the lab info and relying on students to 1. read the directions (a lot of them have a huge problem with this!)  and 2.  understand the directions.  Our awesome STEM coordinator who was facilitating also mentioned that once the students came up with their directions, they may find they don't work wonderfully and then you can tie in the engineering cycle (where you work to improve your model/technique).  For this to work, you have to be comfortable with students not having a "right" answer.  And we know that students are not all too comfortable when there is not necessarily a "right" answer, so this is something we have to ease them into with baby steps!  I am going to try to find my most simple lab to start this with and build them from there!

Vocabulary
There were a couple of techniques presented.  One was a word sort--you give students a set of cards with words on them and ask them to categorize them (in whatever categories they choose).  Individually, we created an outline or a narrative that ties the groups together.  Then, we shared these with each other and we were supposed to use a list of text structures to identify which structure was represented by the arrangement.  I recalled in a previous workshop, when doing a card sort, we were supposed to create new categories and rearrange them (another option).  This is a good way to have students really think about the words.  When looking at the text structures, there were graphic organizers that go along with each one.  I found an example of the type of text structures/graphic organizers (see below).  I thought that if I was going to use this in my science classroom, I may have students analyze a text that they are about to take notes on--if they determine the text structure they could have a better idea of a graphic organizer that they could use for taking notes.
For words that are very important and have a lot of other concepts that depend on them, this next strategy can be used to help students get a deeper understanding.  It is called Four-Fold Concept Development and starts with a foldable.  You basically fold the paper in half twice (to end up with four quadrants). Before you unfold the paper, you will fold in the corner that is where all of the folds come together (where the center of the full page would be).  I found the image below that shows what it looks like when you open it back up (tracing the diamond in the middle with a pen).


In the middle you write the word.  In this picture I found, it looks like maybe they wrote a definition as well.  Then, each quadrant is for a different task.  1. List  2. Rank   3. Compare (analogy)  4. Illustrate (draw).  First, students will list words that they associate with the word in the center or words that are synonyms of that word.  We did this in an adaptation of an all-write round robin where you write one word and then pass your paper on so that each person is writing a word on one person's paper at a time, and everyone ends up with a list on their paper.  Then we did a team stand and share where each group shared an answer and we checked off ones we had, added ones we were missing, until we had at least 15 words.  Once our group had 15, we would sit down.  Next, we had to rank what we thought were the top 3 words from the list (that best represented the word in the middle).  For the analogy part, we had to list 3 items in the room.   We picked one item to write an analogy.  The word we were using was Democracy, so we had to say 'Democracy is like a table because...' for example.  Then, we traded with our partner and chose one of their objects to write an analogy of Democracy for.  Finally, we had to draw a picture to represent the word.

Analyzing text
This was probably the most difficult of all of the sessions.  We were working with the ideas of text vs. context vs. subtext and reading from various stances (critical, philosophical, analytical, intertextual, aesthetic, and metaphorical).  First, we were each given one of the stances and everyone that had the same one had to come up with a bumper sticker and an image to describe it plus two famous people who are likely to read with that stance.  Then, we were reading different texts and had to read them through the different stances and come up with a question we would ask from the perspective of that stance.  We started with Mary had a little lamb.  We practiced a technique called reciprocal reading.  In this technique, one person (A) reads while the other person (B) annotates the text for questions, vocab and connections, which they share with their partner.  B will then summarize and make a prediction of what the next paragraph will be about.  Then, the two switch.  One of the one of the facilitators of this workshop is our awesome ELA and social studies coordinator who ran a workshop a while back where she demonstrated this technique.  I have since used it in the classroom and it is really effective.  We went through this process with another reading (a piece of "micro fiction" which I am pretty sure came from this book) about the Carpathia ship that rescued survivors of the Titanic.  We shared in an inside/outside circle structure.

Next, we did a technique called probable sentences, where we had a list of 10 phrases or words from a text we would be reading and had to write 3 sentences that used all of the phases.  Then, as we shared our sentences, we came up with questions that the sentence spurred.  Our facilitator typed the sentence and the questions into a document on the white board.  She said that seeing words being produced helps English language learners with learning English, which I thought was interesting.  She also said that in doing this process, some of the students' sentences (and questions, I guess) were being published, which is an interesting way to think about it.  Since required performance and having an audience is such a big part of cooperative learning, this seems to align with the cooperative learning model, but more in a whole class format than as individual groups.  Next, we were given the poem "Strange Fruit" and asked to the underline the sentence that was the most important/striking, bracket the phrase that was the most significant/powerful, and circle the word that was the most vivid.  We shared in a circle where we were supposed to share our sentence in no particular order (just said ours randomly), then our phrase, then our word.  Then, we did a juxtaposition of two texts.  The first text we were given was about Billie Holiday and the poem/song that was written from an outsider's perspective.  We were supposed to read it through the lens of one of the stances, came up with a statement about it, and shared round robin.  Then, we did the same thing with one written from Holiday's perspective and went through the same process.  Finally, we actually watched a video of Holiday singing the song.

This whole process was really powerful, but it is hard to see how to work it into a science classroom.  I think I could use the bumper sticker/image tool for introducing new vocabulary at some point.  I don't know whether I would feel comfortable teaching with the stances because I am not totally sure I even understand the differences myself, but the idea of reading text from a different perspective is interesting.  Like, in science we could have students try to read from their own perspective versus the perspective of their parents, or a famous person that they can relate to.  The juxtaposition could be useful when looking at a controversial topic from different perspectives.

Interpreting Non-linguistic Representations
Our amazing STEM coordinator presented a problem in the format developed by Robert Kaplinsky.  Side note, I just looked him up to link his page and holy cow!  He has a ton of awesome problem-based math problems on his site.  They are super amazing because they have all of the figures you need and everything!  It is literally a one-stop shop for problems in this model.  They are based on the Smarter Balanced assessment structure, which a lot of states are already moving to because they are aligned with the Common Core.  According to this graphic, Smarter Balanced assessments will be used in Missouri too, and I think it replaces MAP testing, though I could be totally wrong on that.  If I remember correctly, at another workshop I got the impression that the Smarter Balanced Consortium and the people that produce the ACT are somehow in linked so the ACT may be transforming in the future as well.  Regardless, prepping students for the science portion of the ACT means lots and lots of practice with interpreting and integrating graphs and charts so this will be very important practice.  All of that business aside, problem based learning for math is very valuable practice so I am excited to have access so such great resources.  Notice at the bottom of each one, the Common Core standards that each problem aligns with are listed which is super handy!  This site is probably the single most useful thing I got out of this workshop.

In this problem, we were trying to determine whether it was financially beneficial to buy a hybrid car over a conventional car.  The framework we used for this had the following components:

  • What problem are you trying to figure out?
  • What guesses do you have?
  • What do you already know from the problem?
  • What do you need to know to solve the problem?
  • What should we title this lesson
  • A section for work
  • What is your conclusion?  How did you reach that conclusion?

We solved the problem in this framework.  Something that was kind of different was for when we were writing the conclusion, our facilitator had us write it as a letter to a friend about why we did or did not decide to buy a hybrid car.  This kind of ties back to that original idea about making writing a little more social.  Otherwise, they could have just written how they came to the conclusion but that would have been more boring!  And in writing a letter, you can include ideas that are not strictly related to number crunching.  I could see doing this in a whiteboarding session too, where students explain their thought processes to the class.  In science, we have been trying to incorporate more opportunities for students to make a claim and support that claim with evidence, especially now with the Common Core being implemented.  This is the perfect time to have students make a claim (their solution to the problem) and support that answer with evidence (what they figured out to come to that solution).

This reminds me of a project I did a while back in which I had students determine a plan for painting the walls of my classroom.  They had to measure the room and determine how much paint they would need, research prices and types of paint, look into why certain colors may work better than others, and present their budget based on what they came up with.  It was awesome, but it took a lot of time!  I like that some of the grunt work has already been done so that it is not quite as overwhelming and time consuming to develop.

Side note:  as part of this session, we were analyzing a lot of charts and graphs.  We were asked to determine which parts of the figures we should look at first, second, etc. and come up with a mnemonic to remember.  I rather like the one my group came up with, so I will share it with you.  It is a little rough around the edges still, but if I can get it a bit more polished, I can totally see using this with my students.  Get this, it is an acronym of the word CHARTS--how clever are we?!

Colors (and keys)
Headings/labels
Axis scale
Read data
Trends
Source

Ok, it isn't that great, but I am oddly proud of it--this was not an easy task!

I would love to change some of my labs into more of a problem based model, even ones that are not math based.  I could see using this framework in conjunction with a CLOZE to help them determine an appropriate procedure to use.  This totally beats the traditional lab write-up!

Throughout our workshop, as we presented to the class, we celebrated each other!  These are so great for team building.  I want to be keeping track of these things because I am not creative enough to think of my own.  I mentioned suggestions for supportive statements in supporting peers and working on social skills in my post on cooperative learning (remember the Wayne's World one?).  There is also the Elvis one which I think I forgot there (thank ya, thank ya very much).  Here are a few more fun ones I am going to try to integrate.  These are so so hard to explain but I am going to do my best.

1.  seal of approval:  Hold your arms out in front, palms facing each other.  Now, flip your hands over and clap the palms together (kind of intertwining your wrists).  Like a seal! Get it?
2.  wave:  Like at sports games; stand up lift your arms in the air and say woo!  The wave can travel around the room.
3.   roller coaster:  Lean right, lean left, then lift out of your chair and do a mini wave (don't forget to say "woo"!)
4.  drum roll:  Use index fingers to drum on the table
5.  Rocky:  High five and go duh duh duhhhh duh duh duhhhh (you know, that song from Rocky!)
6.  round of applause:  Clap in a circle!
7.  fireworks:  Clap and then wave fingers out (could snap or just wiggle fingers)

At the end of the workshop, we did a quiz-quiz-trade, which I have talked about in other posts on Cooperative Learning, but I did get a new tip!  If you need a little more control over your group of kids, you can have them form two lines, facing each other and have them move down one at a time (I would guess that once a student gets to the end they have to run to the other side.  I guess you could do it in an inner/outer circle format as well.

Thursday, May 26, 2016

Moodle is leaving! Back up and some possible contenders

First, quick vent that I am pretty frustrated that our district is getting rid of our Moodle subscription this summer.  I have been pretty hot and heavy with Moodle for a few years now and I have SO MUCH stuff I need to get off of there.  I do recognize, though, that it is not the best online classroom environment and is a little clunky and I have been wanting to move to something else (a Google site, in particular) and this is the perfect push I need to get going in that direction.

As far as alternatives to Moodle, Edmodo is probably the best contender.  Something that I really didn't like about Moodle is that students had to log into a separate world to access class content.  It was great because it was password protected but it was a nightmare to get parents access (I might have been making it harder than it was, but this was my experience).  I don't know if Edmodo will solve the parent access problems that I had, but Edmodo is still an alternate environment that students have to make an account for.  The nice thing about Google sites (and Google classroom) for us is that all of our students now have a school assigned Google account and we work in the Google framework on a regular basis.  I like, though, that with Moodle and Edmodo the content is password protected.  With a Google site, it is pretty much accessible by anyone at any time.

Another site that I have been recently considering is Blendspace.  This website has been brought up at other workshops, but at a recent workshop on the flipped classroom model, I got to see it in action.  On Blendspace,  you can arrange resources into groups ("lessons").  Students need to make an account for Blendspace, so it doesn't move you away from having a separate site, but students can create an account with their Google account, so as long as they are signed in to their Google account it should automatically log them into Blendspace.

One of my biggest concerns about losing Moodle is that there is a flow of information that is not preserved in a backup on your computer.  I will be losing a lot of student work as well.  Schoology is a site that seems to be a solution to the first problem, but not the second.  Schoology was introduced to me by my technology specialist as a good alternative to Moodle.  While I'm fairly certain I won't be using it as an alternative (for similar reasons to Edmodo), it is going to be my storage system.  When you back up from Moodle and import into Schoology, you get a pretty close approximation to the order the information was listed on Moodle.  It is the closest thing to Moodle I have found so far.  Even the weblinks are preserved.  To maintain the familiar look of my Moodle pages, I have taken screen shots of all of the classes in addition to making the backup copy of all of the files.

There are also some features that I am really going to miss--"choice" in particular.  Google forms are a good alternative to choice, but it is not the same!  The things I like best about choice is that I can see all of the results in a really easy to read table format and I can set a limit to the number of students that can choose a particular option.  So far, I have not seen these on forms.  I use this when having students select appointment times or choose topics.  Below you see what the student sees (top) and what I see (bottom).


Student view


Teacher view


I came across a link that talks about how to "Dynamically remove choices" from a google form after they have reached a defined limit.  I have not looked at this yet, but it could be one solution!  Another way to have students pick is simply by creating a google doc that they can all edit.  I have tried this and students acted maturely for the most part!  It is definitely something that has to be monitored.  If you are a GAFE (google apps for education) school like us, then you have institution assigned email addresses for students.  You have the sharing option for the doc to only be accessible by those in your institution (with the link).  Selecting this option forces them to sign in, which is very helpful because you can track edits and see who is responsible for any untoward edits :)  If any of you use or know of something that is capable of what I described above (choice from Moodle), please share in the comments!!

Tuesday, May 24, 2016

Flipped classroom

I've been to other workshops about the theories behind a flipped classroom model, where a lot of information delivery is done out of the classroom and a lot of the application work is done in the classroom.  But this is the first workshop where a teacher literally went through "this is how I do it" and that was really helpful.  While I am not about to totally flip my classroom, there were some really great tips that I got that can apply whether you are flipping or not.

One of the most useful parts of this website was the facilitator's demo of how she uses Blendspace to deliver class content.  Our facilitator compared Blendspace to a kind of an electronic filing cabinet.  Students create an account and join your class with a key.  You create groupings of materials into "lessons" that are pushed out to the students.  The way she used it was posting her video for the lesson, along with materials that were related to that particular lesson (electronic copies of assignments, powerpoint slides, etc).  You can verify which students viewed the lesson, which is helpful, though I am pretty sure it is just a matter of them clicking on it, you can't verify that they actually watched the video.  (The only place I have been able to find where you can verify that students watched a video is on EdPuzzle.)  One nice thing is that you have the option to share a lesson with multiple classes, which is a feature I recently discovered in Google Classroom too.

As far as logistics of making videos, they should be not much more than 10-12 minutes and there are a lot of places to make them.  In this instance, they were using Snagit, which has a free version or a more complete version for $29.99.  Camtasia is another option that I learned from the teachers at the Mastery classroom workshop I attended, though this is another expensive one.  (Note: there are plenty of free screen capture programs, but I am not familiar with a lot of them and am just listing ones that have been suggested in this workshop.)  Then, all of the teachers in the building would upload their videos to a shared Screencast account ($99.95/year).  She said that their administration was very against them using YouTube for their videos, so they were willing to pay this yearly fee.  She also talked about when making videos, she would give students instructions during the video, like when they should pause to write something really important down, or that they should stop at a certain point if they were comfortable with the concept or continue to see more examples.  She also mentioned doing a wrap up at the end of each video, where you go through what they should have gotten from the video/written as notes/etc.  For audio, she uses a Snowball microphone which she says does well to cut down on background noise.  Apparently our libraries are supposed to have these for us to borrow, so I need to look into that.  She uses SMART notebook to write out demos in the videos, using an Airliner (I had one of these at my last school, but need to track one down for current use...).  She suggested to turn off the SMART ink feature so that your annotations disappear when you advance to the next slide.

She gave some examples of things to include in the videos and some of it was what I would have expected but there were a few ideas that I hadn't thought of.  For instance, just create a video with you working through review problems.  Or create a video answer key for a study guide.  Also, you could make it interactive and more like a game or even go through a laboratory procedure.  You could do a flashcard format type of review on a video as well.  I especially liked the idea of doing review problems.  I feel like this is something I can add immediately and fairly easily.  To be honest, I am not considering flipping but I have been wanting to make supplemental videos for my students and I think that is a good place to start.

Some of the logistic stuff she covered was really helpful and could be useful even without flipping.  Here is a list of random things that I learned about:
1.  use familiar logos as identifiers for table groups (picture for each student or each group)--she had facebook, instagram, twitter and snapchat (that's the ghost, right?)
2.  use signs on the tables for students to sort themselves based on where they are when they walk in:  I got it, I have just one question, I need a lot of help, I didn't watch the video (I like this idea of grouping because then when I go to the table that just needs a little help, for instance, it could be that everyone was confused about the same thing and it would be much more efficient that way)
3.  have a set of devices on the table for when students have not watched the video (and require headphones in class supplies)
4.  demonstrate how to watch a video at the beginning of the semester--play one of your videos and show them what to listen for, how to know when to stop and take notes, etc.  (this is a great idea, and one that I never would have thought of)
5.  give a survey at the beginning of the year about access (and include the question "if you stay in two houses, do you have access in both?" for students whose parents share custody)
6.  if you have a student who has a device but no internet access, download your videos on a flashdrive for them
7.  enlist your librarian to help you--make sure they know how to access your videos so that a student can go to them to get help with access or download them per #6 when you aren't available
8.  put a video camera up in the corner of your room and tell students that it will be on sometimes for you to evaluate yourself as a teacher or to share with other teachers to help them (to help students stay on task and be on their best behavior more often)

Once the students have watched a video for homework, they would come into her class and sometimes they would just get right to work.  She had crates set up with the lessons so they knew how to find what they needed.  Some days, she would have the table signs up (#2 above) for them to assort themselves.  Other days, she would post a STOP sign on the door as a signal to the students that they should not come in and just start working--on days when she wanted to start with some full class instruction.  The students would know what to be working on from their calendar.  As a class, they would fill out the calendar each week or so at a time.  There would be a place for teacher initials when they completed a task.  She would hang answer keys around the room so they could check their work.  Sometimes, she would have other kids who were getting finished quicker be volunteer checkers and she would ask for students who were ready to be checked to raise their hand and her helpers would do the checking.  She made this an opt-in situation for the other students in the room--they did not have to volunteer to have their calendar checked by a peer.

This was a math teacher presenting and in our district a lot of the math classes have been going to standards based grading.  So, all of the learning experiences she provided were not graded.  She would give formative assessments that students would have to complete correctly before they could take their summative.  She would grade the formative immediately, standing right next to the student so they got immediate feedback, and she had more practice available for students that did not pass.  She talked about having advanced students make a video as a formative assessment.  This was another thing that she used her librarian for help with--she would send a student to the librarian for help on making the video.

That pretty much sums up everything I learned today!  Here I will add one more tidbit that I must have come across, but I can't remember how/why.  It looks like a cute way to make solving math problems more fun:  FACEing math.

Monday, November 30, 2015

Adaptive assessments

Making adaptive assessments using Google Forms takes some getting used to.  You will basically be manipulating the Forms environment to do something it is capable of, but not set up naturally to do.  I imagine one day someone will write a script to do this in a more automated way, but for now we have to work within the constraints we have in Forms.

First, I'll start with some of the rationale behind using adaptive assessments.  Traditionally, we have all used linear, fixed form assessments--everyone gets the same questions in the same order.  The scores that students get don't always reflect the true level of students' understanding.  Some students may be able to answer questions at a high level but could make silly mistakes on the lower level questions.  Others may be able to answer the questions at a lower level, but miss the more rigorous questions.  When you make an adaptive assessment, you can set it up so that the questions students get change depending on their answer to the previous question.  You can also embed remediation into the assessment itself and give instant feedback on answers as correct or incorrect. This could be a really powerful tool once you get the hang of it!

There are a lot of limitations when you are trying to create an adaptive assessment in Google Forms.  If you are going to create one, you need to try to start small!  It becomes really cumbersome if you have a lot of questions.  Depending on how many directions you take each question, it can become really complicated really quickly.  You will potentially be writing many more questions than students will actually see. This process is best for short formative assessments, as opposed to a longer summative.  Plus, there is no way to remove the "back" button, so students could figure out that they are able to re-try a question.  If you are making an adaptive assessment in Google Forms, it needs to be multiple choice, which limits the way you can ask questions.  To overcome the fact that students can get a multiple choice question correct by guessing, you could ask a follow up--how confident are you about your answer?  Or add a text box in which you ask them to explain their thinking.  Be aware that your spreadsheet data that Forms produces will look quite a bit different than what you would normally get.  Not all students will answer all questions.  Data interpretation may be a little tricky.

When setting up an adaptive assessment, you can have various places for questions to go, depending on your goal for the assessment.  Ideally, the assessment responds to individual students' abilities.  For instance, if a student gets a question correct, you could have them try a more difficult question next.  If they get it wrong, you could send them to an easier question or to some type of support.  Some of the suggestions our facilitator had for landing from an incorrect answer are videos, notes, weblinks.  You could send a student to a text box to explain their thinking whether they got a question right or wrong.  You could set up the next page to tell them if their answer is right or wrong so that the students get instant feedback.   The assessment doesn't even need to adapt to their answers--you could have the same set of questions for everyone but simply have their next question on a page that tells them whether or not their answer was correct.  It sounds really complicated until you actually try it.  And it is complicated, but once you start to play around with it, what you can do with it will make a lot more sense!

Before you start trying to create your adaptive assessment, you want to create a map.  Sketch out how the questions will flow and where different answers will take students.  In order to make an adaptive assessment, you will need to make sure you put each question on a different page (add a Page Break between each question).  For the question, click "Go to page based on answer."  When I was creating my assessment, I changed the page title to tell me something about what question was on that page.  This helped tremendously because when you choose the page to go to after a particular question, they are listed by their titles and it's a lot easier to find that next question.  Do not require any of the questions (except ones that you know every student will see) or they will not be able to submit their completed form.

When you are mapping out your questions (and also when entering), I suggest working with the all "correct" track first to keep things simple.  That would allow you to work with a simple linear test at the beginning, and then go back to add in other directions.  A fellow teacher asked about a way to set it up if you want them to try all of the questions, and if they get any of them wrong, they still see the same next question BUT you want them to get remediation at the end if they missed any of the questions.  Our facilitator suggested setting up a duplicate of your "correct track."  Then students could be diverted to this duplicate set of questions once they miss any of the questions.  See a map of what this may look like below.


Another idea our facilitator suggested as an application, for a case in which you want to collect data on students and the data you are collecting may be slightly different.  On the first page, a student could select their name (or you could select) and then there would be a different set of questions for each student.  He suggested this could be used to collect data on behavior.

Here are a couple of tips for Google Forms that will be helpful for creating these assessments and in general that I learned during this workshop:

  • you can embed a Youtube video in a Form
  • if you are creating the Form logged into your organization, you can require students to be signed into their official account BUT if you want students to access from their devices, you may want to unclick and just have them enter their name on the first page
  • you can zoom out on your browser to see a lot of your pages (or questions) within forms at once--this will help you from getting lost when making an adaptive assessment
  • copy the form and rename the copy to give to a new class to keep data separate

A kind of side note here... this really reminds me of the Choose Your Own Adventure type books that I used to read as a kid!  There are websites that can be used to create that type of thing.  I wonder whether any of these tools would be useful for creating an adaptive assessment.  I am going to have to look into this further.  For now, here is a link of one that I found with a quick Google search: Create your own Choose Your Own Adventures!


Engagement for all

This workshop on engagement was very focused on cooperative learning, so there was a lot of review, but there were some new ideas that were presented.  I am basically going to dump it all here in the form of a list

  • using colored table markers or some other identifier, like content-specific pictures (especially good to use so you aren't numbering the tables and seats, which could get confusing)
  • facilitator referred to time that a student has to speak as "airtime" (I thought this was cute!)
  • when a student runs out of things to say in their allotted time tell students they should sit in the silence, feel the silence--so they don't just jump in and rescue each other (this would be good to employ at certain times, other times focus may be on training students to ask productive questions)
  • when doing an activity where personal sharing time is not structured, remind students to make sure to involve everyone--if you notice someone that is not participating, ask them questions
  • hogs vs logs (those who dominate vs those who don't participate in a group)
  • using any of the following as an eraser for dry erase boards: fabric glove that you would use to wash a car, swiffer pads cut up, felt (what I use), an old sock, pom poms glued to markers
  • tell students to work on making sure that every voice is being heard and no voice is dominating the conversation
  • let students know that these are skills they should be using out in the real world (even if they are in kindergarten and the "real world" is just recess)
  • roller coaster high five (make a roller coaster motion with your hands before high fiving)
  • make sure that learning is collaborative and not competitive (don't pit one table against another)
  • some students need a "personal invitation" to get started on a task (I really liked this phrase)
  • in the PIES for cooperative learning (see below), when you are trying to ensure individual accountability, do not give group grades


  • a whip around (every students gives an answer) is good when you want to reinforce something important--students will likely hear similar answers multiple times
  • when doing a card sort, assign cards to each student so that each student only touches their own cards
  • a fellow teacher reminded me about what I used to do for grouping--use card suits (you will end up with four students in each group--one for each suit--and you can pull as many cards as you have groups)
  • for fan-n-pick, have a set of generic cards labeled 1-10 (or whatever) so you don't have to make the cards every time--then project the questions on the board, numbered 
  • when doing inside outside circle, give more specific instructions:  first evens make a circle, then odds stand behind an even
  • have students high five someone as they go past in inside-outside circle
  • say "thank you for the 80% that responded, now we need 100%"  (I liked this because a lot of times whatever I say to the class makes some kids feel like I didn't recognize that they participated)
  • "if you want to make a gain, it's going to be painful" (we were talking about this a lot in terms of kids who have trouble talking in front of other people)
  • we did the final word protocol (first saw this in collaborative problem solving) but in this version, the first person only says a quote from an article we read and does not comment on it until everyone else has and then they get the final word (doesn't influence others' thinking as much)
  • we used the following indicators when reading:  !=new thinking, ?=something you question or want to ask about, *=agree, x=disagree
  • have each student use a different colored pen or highlighter to see their contribution to the work
  • we read an article about levels of engagement and this schematic below was the most useful--notice the pie charts at the bottom (in particular, the highly engaged classroom does not have 100% engagement because it is really unrealistic)  our facilitators mentioned showing this to the evaluating administrators which is definitely a good idea
level of engagements

  • two new silly games!  
    • baby blob--one person is the baby blob, when they tag someone, they link arms...blob grows as they continue to tag people and add (warning, we knocked a ton of drinks over playing this game!)
    • rock paper scissors cheer--rock paper scissors in groups of two, winning person finds another person to play against while losers become cheering squad (will end up with final two people and everyone else cheering!)
  • silly games are supported  by the Mindsets in the Classroom (by Mary Ricci)--gets blood/oxygen to the brain and promotes mental strength and alertness
  • facilitators had us write a goal for the year that they will email to us at the start of the semester (I have seen this in another workshop before and think it is great idea--note to self if I ever facilitate a workshop)

A few ideas that popped into my head during the workshop...
  • family feud affirmation--"good answer, good answer"
  • have students fill out a "what was my contribution?" questionnaire with a group project and grade just that part for them (for individual accountability)
  • create a generic card that has a place to write a role for each group member (for example, when using fan-n-pick).  Have students write in the roles so you don't have to print a separate mat every time you want to do an activity where students have rotating roles.  We talked about using dry erase or post-its to re-use it.
  • my teammates and I came up with the acronym RINGS to represent engagement:
    • R=Respect/Risk/Relevance
    • I=Involvement/Interdependence
    • N=No hiding
    • G=Group interaction


Friday, October 30, 2015

Accommodations and Modifications

I teach a lot of co-caught classes, which means that I work very closely with a teacher from special education in my classroom in classes that have a high percentage of students with IEPs (Individualized Educational Plans).  Last year was my first year of experience with co-taught classes.  Of course, we are all aware that our students with IEPs have lots of accommodations listed for us.  But I was thrown for a loop the first time I had a student who was on modified curriculum for my class.  It was just one or two before I started co-teaching, but now I can have 4-5 within one class!  It is really overwhelming to figure out what modification means and how it applies to each student.

First of all, what is the difference between accommodations and modifications in the classroom?  Accommodations are supports that we give students to help them access the standard, guaranteed curriculum.  Modifications actually change that curriculum to make it more accessible to the student.  Another teacher came up with a great simple way to remember the difference; accommodations change the means, but modifications change the end.  If you are thinking about this in terms of UbD (Understanding by Design), you can imagine it in terms of stages, accommodations would not really affect stage 1 (knowledge and skills) and 2 (assessment) much, but a lot of stage 1 (teaching practices).  The test may look different, the content covered is the same.  Modifications would really be affecting stage 1 and 2.

Usually in my building, when I have a student on modified credit, I get handed a contract that often essentially says 'modifications at the teacher's discretion.'  It is really hard to tell what that should look like.  Historically, working with special education teachers and aides, that has meant changing tests to remove a couple of answer choices and weighting homework and test grades differently, and really just a lot of fiddling with grades.  All of this turns out to truly be more accommodating than modifying.

We were given resources for ideas for accommodations.  Accommodations can be for assignments, grading, text, test/exams, lectures, reinforcement, pacing, or environment.  But, let's be honest, accommodating isn't something that is super difficult for us as teachers.  It is the modification piece that is much more mystifying.  It was suggested that you start either with your standards or your assessment, whatever is easier.  And you want to go through and see where changes can be made.  You want to focus on what the students will need the most for their future goals, either academic or in life.  You also want to think about what they would be capable of when choosing material to make sure to cover with them.  There are some tools provided for planning on the SSD website under "cool tools."

When I went to a standards based grading workshop last summer, my thinking about teaching changed a bit.  While I am not totally ready to move all the way into a standards based grading model, the ideas behind it stuck with me.  Basically, my thinking is that a lot of standards can be lumped into a tiered model.  Learning targets should be tiered, with learning goals beginning at the entry level and going up from there.  If you have four tiers within a standard, you would probably teach through the top tier, but you would expect that students successfully accomplish maybe through the third tier, with the fourth as an extension.  If students need remediation, you would remediate to the tier you expect all students to master, and not waste precious time re-teaching at the top tier. When I started thinking that way and creating tiers within learning targets, it actually made the idea of modifying curriculum and tests much easier for me this past year.  The goals that you would expect a student on modified credit to get to would be maybe the second tier with the third tier being extension for them.

When thinking through the tiers, it is pretty easy with a skill.  In fact, the only standards that I fleshed out in this model last year were math skills that we cover in science.  To determine the tiers, I think through the process I teach the material.  I think, if I was helping a struggling student, where would I start?  That would be the first tier.  The next step would be the second tier and so on.  This made such a difference in how I felt about modification in my room and it made so much more sense than just grade adjustment.  I would structure an assessment so that the problems were chunked based on tier, which made it much easier to create a modified assessment.  All I would have to do is remove the tiers that I was not assessing a certain student on (or a learning target altogether, if necessary).

Something that was especially useful in this workshop actually was not related to modification really at all.  We were looking at some math assessments from Algebra, in terms of how they could be modified.  Algebra is the math class my freshman are taking while they are learning basic chemistry and physics from me.  Looking at this assessment and talking to a teacher that teaches the class was very enlightening.  She also showed me how to find the other assessments.  Just seeing the language that they use and the way that they assess some of the concepts that we also cover in physics was so helpful and will change the way I teach some of this material.  (Note to self:  I drive--teachers--math--alg 1--assess for 2015-2016--linear graphs)

Another reason this workshop was so awesome is that we saw the new modified curriculum contract (now called an learning plan, I think) that will be used.  Going to workshops really helps me stay up to date on what is going on around the district or in the world of education.  The new document includes areas to specify what the students post-secondary goals are, which accommodations have been tried but didn't necessarily work, and more details about the way the curriculum is to be modified.

There are a few reading/vocabulary protocols that were presented that I want to record here as well:
  • Three A's:  on one card/post-it write one thing with which you agree, on another one thing with which you argue, and one thing to which you aspire--then they had us share and one person summarize the consensus of the group for the first one, then repeat for the second (different person summarize), and the third.  Then, each person writes an Aha; something that they realized or learned from someone else.
  • Headbanz game variation:  have students line up and one student will be at the front of the room.  The student at the front faces the rest of the students and either you can project a word behind them or hold a word over their head.  The rest of the students give them a clue one word at a time (each student can only say one word).  At least three clues should be given before the guessing student makes a guess.  Once a student gets a word, the next student comes up and the process starts again.
  • Check, !, ?:  When reading, put a check next to something you know or understand.  Put an exclamation point next to something that you feel is really important info.  Put a question next to something you need clarification or elaboration for.